
It feels pretty great when you discover new ways to utilize a product to better optimize and fit your needs. It’s fun and satisfying, especially when it works out perfectly.
Even though Squarespace isn’t 100 percent customizable, there are some pretty great ways to rearrange their easy to design web features to fit a variety of purposes.
Seeing that we at Alltech provide consulting and staffing needs for a range of top fortune 500 companies, I wanted to come up with a way where we could host and localize our own job listings. Encouraging more engagement on our company website.
So i went to work, transforming the Squarespace key blog feature into our own personalized job board. It’s been working beautifully for us, so why not share the knowledge? I’m sure someone could find this hack beneficial even if it’s not for posting open positions.
For this hack, our squarespace page is set up using the the template Hayden.
Let’s Get Started
Step One.
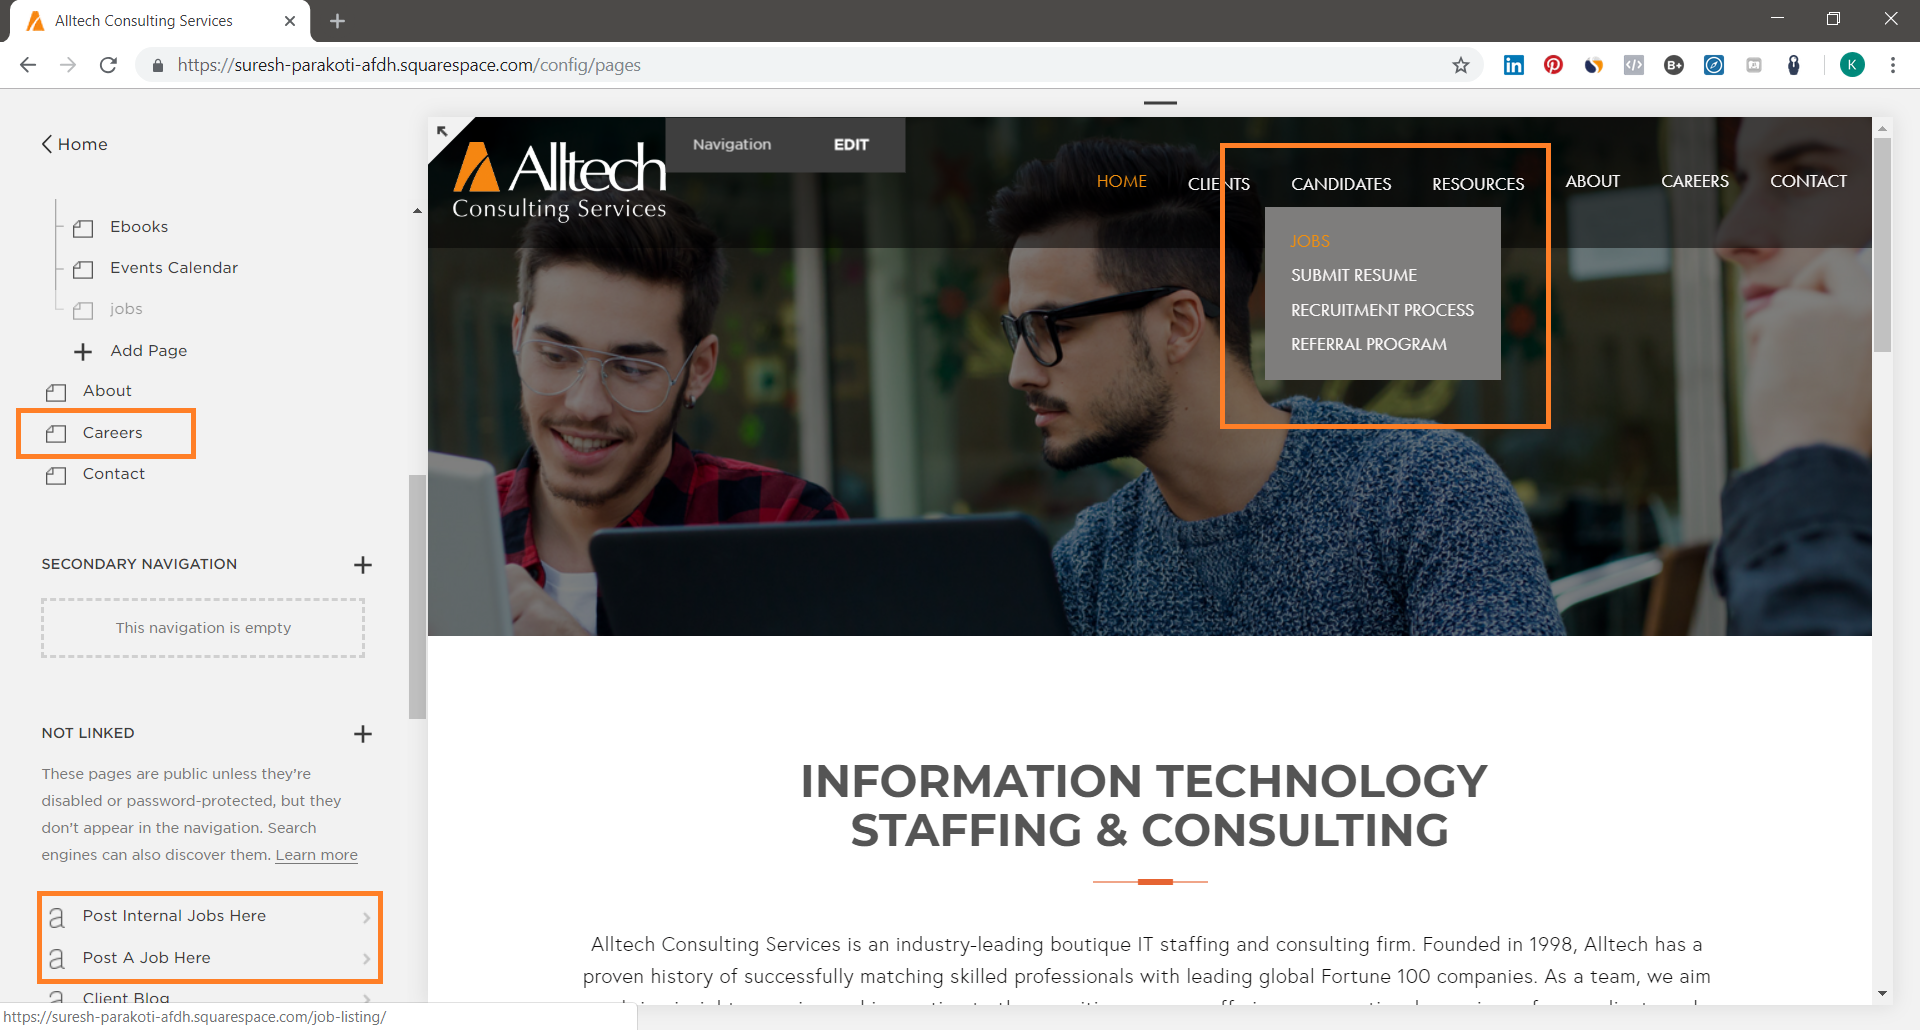
First, you are going to need to create a new blog page that will be left unlinked from the navigation bar. You can name this anything you like, but be sure to adjust the blog settings if you want a different name to appear in the URL link on the live page. Next, you will create a second page which will be linked to the navigation bar. Giving candidates access to your open opportunities. This page will house a summary block that will give you the ability to design and give you that job board visual you are looking for.
Step Two.
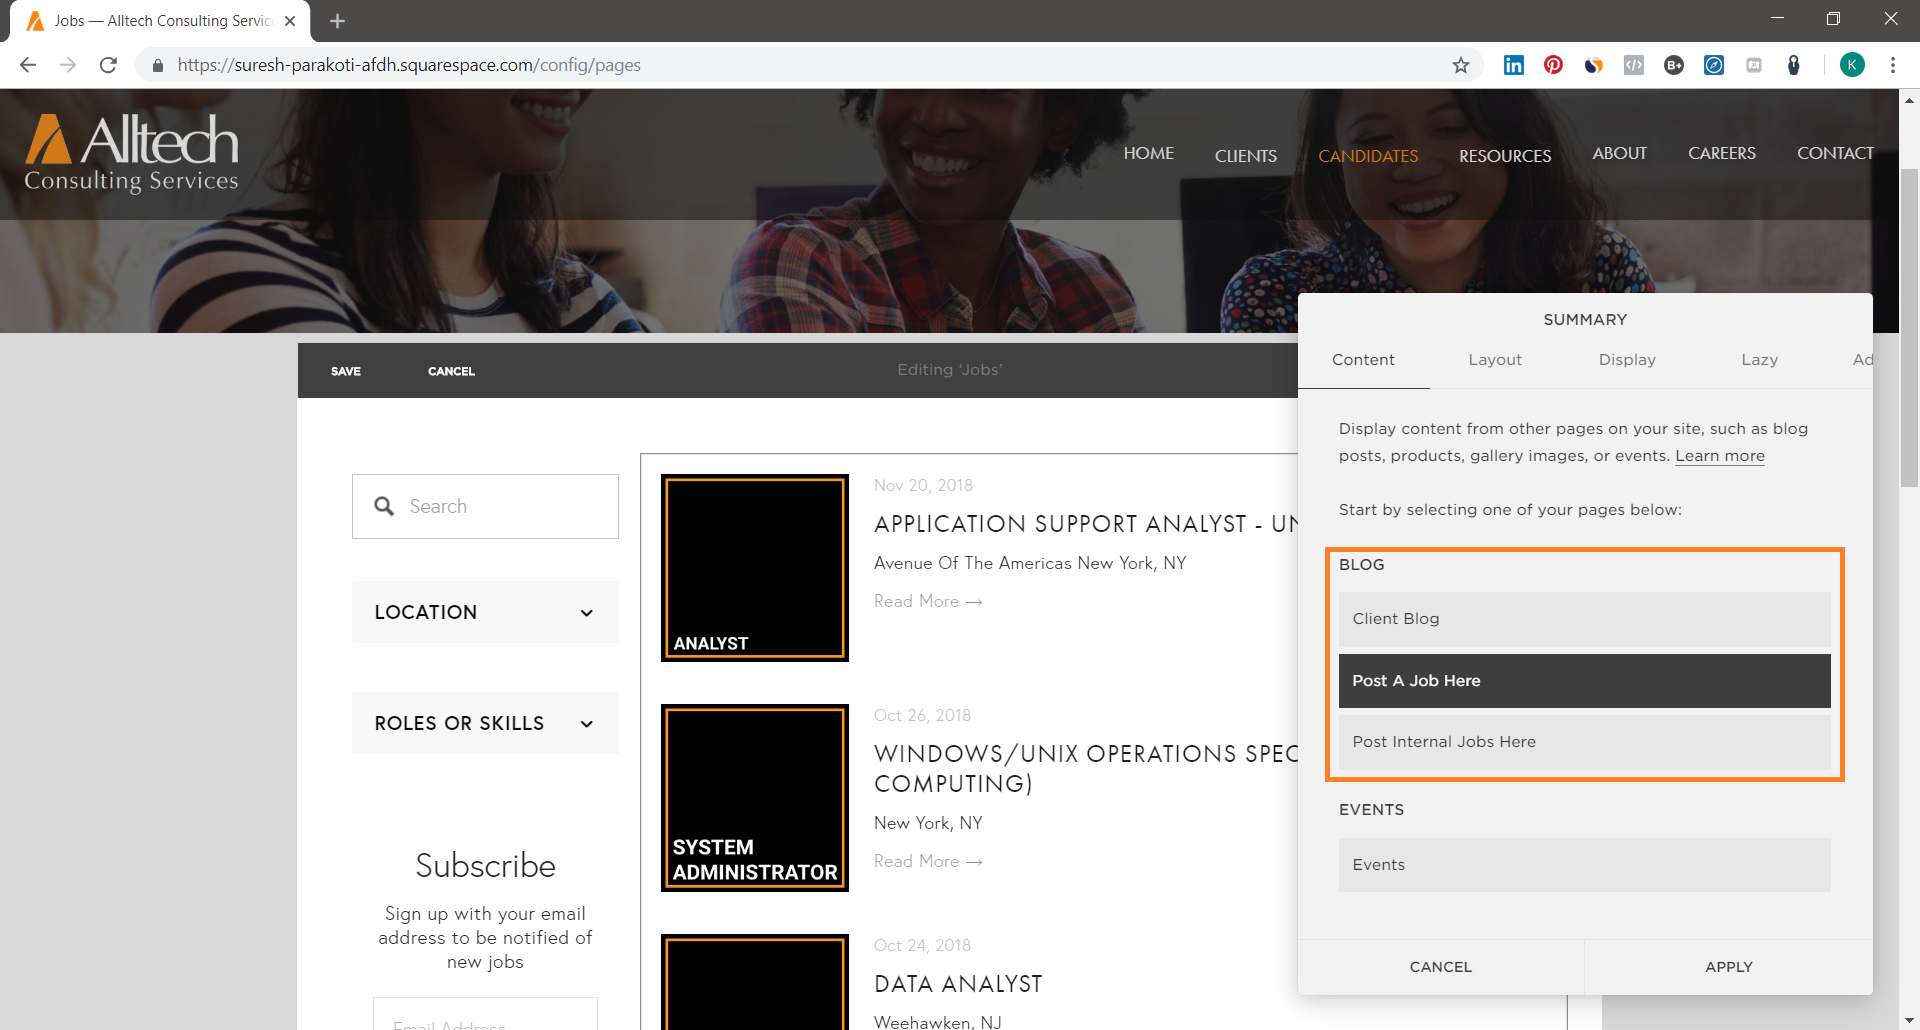
Next, open the page linked to your navigation bar. Here you will design the visuals of your job board, starting with the summary block. Add the summary block to the page and make sure you go into the settings and attach it to the new blog you left unlinked. This is necessary in order for all of the listings you post via the blog to appear on the job board.
Step Three.
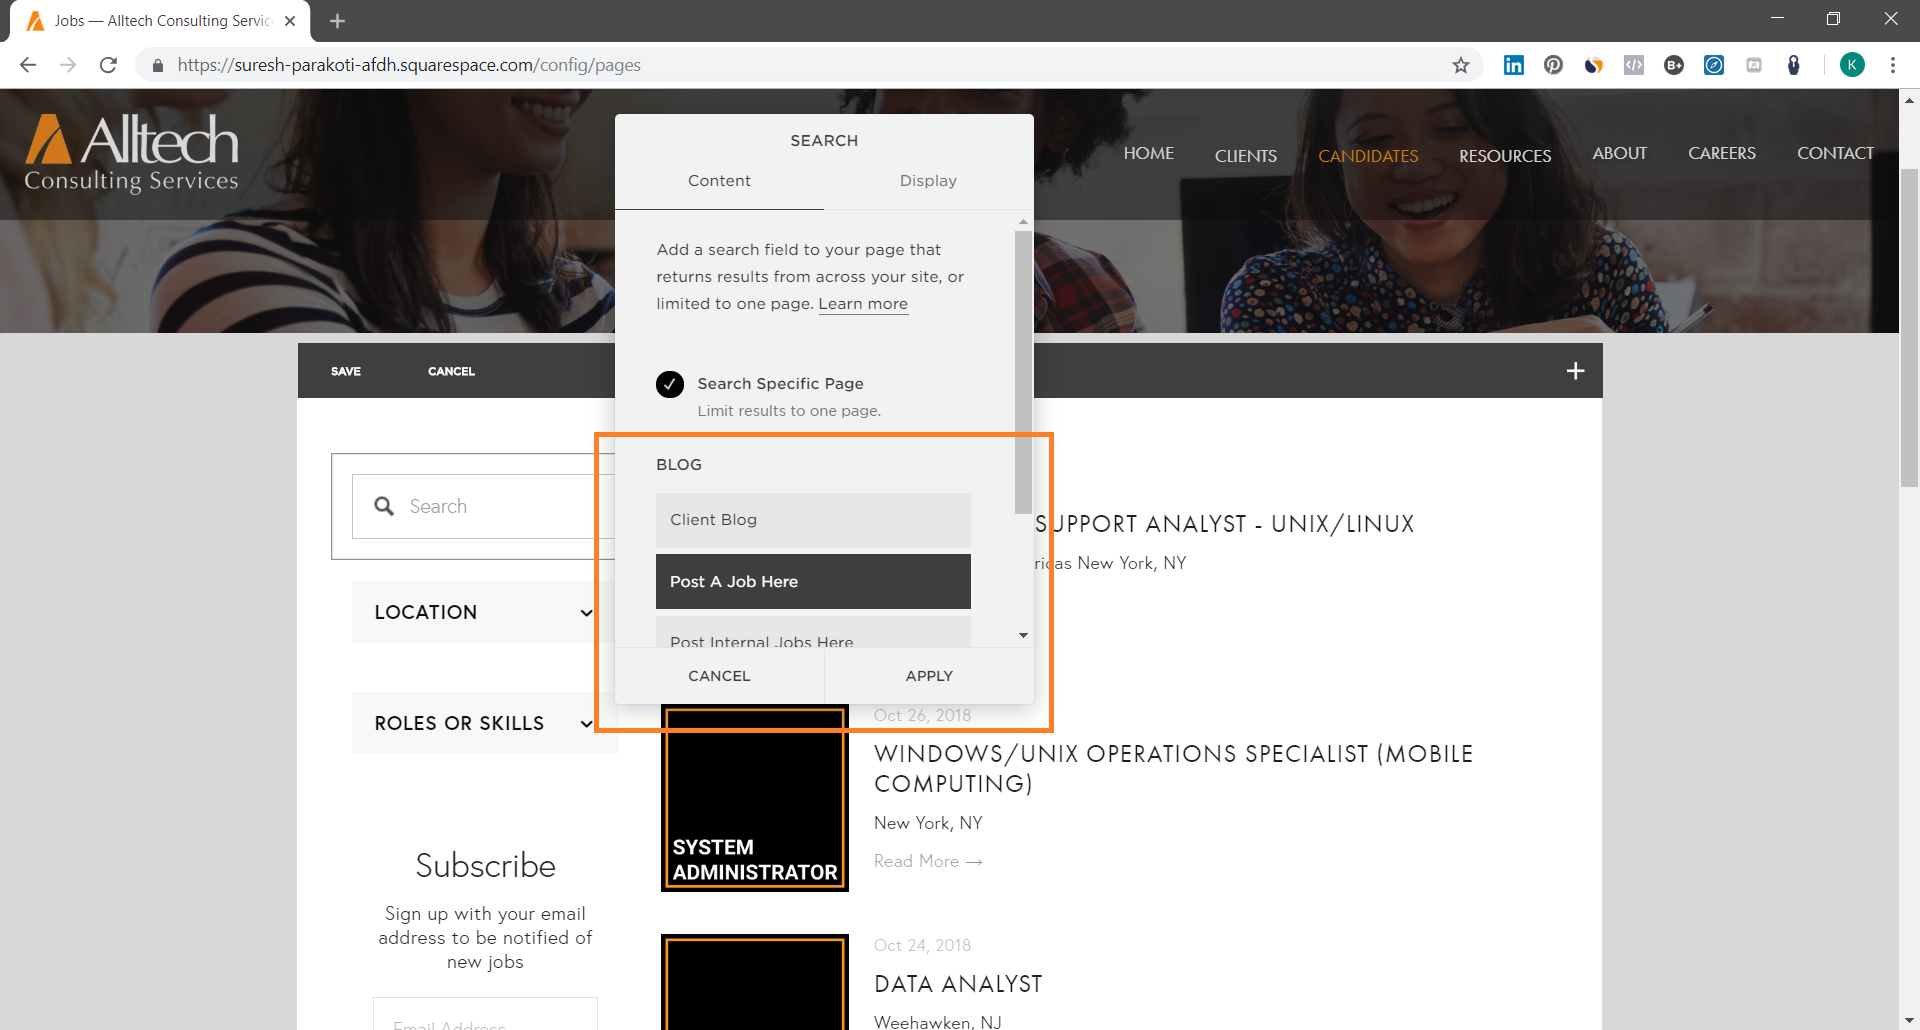
From there you can add additional blocks to complete the page. Including, but not limited to a search bar, drop down menus, and a subscription box. The search bar settings can be set to only search for keywords limited to the blog that will be housing all the listings for your job board. Keeping it separate from the rest of the website.
Step Four.
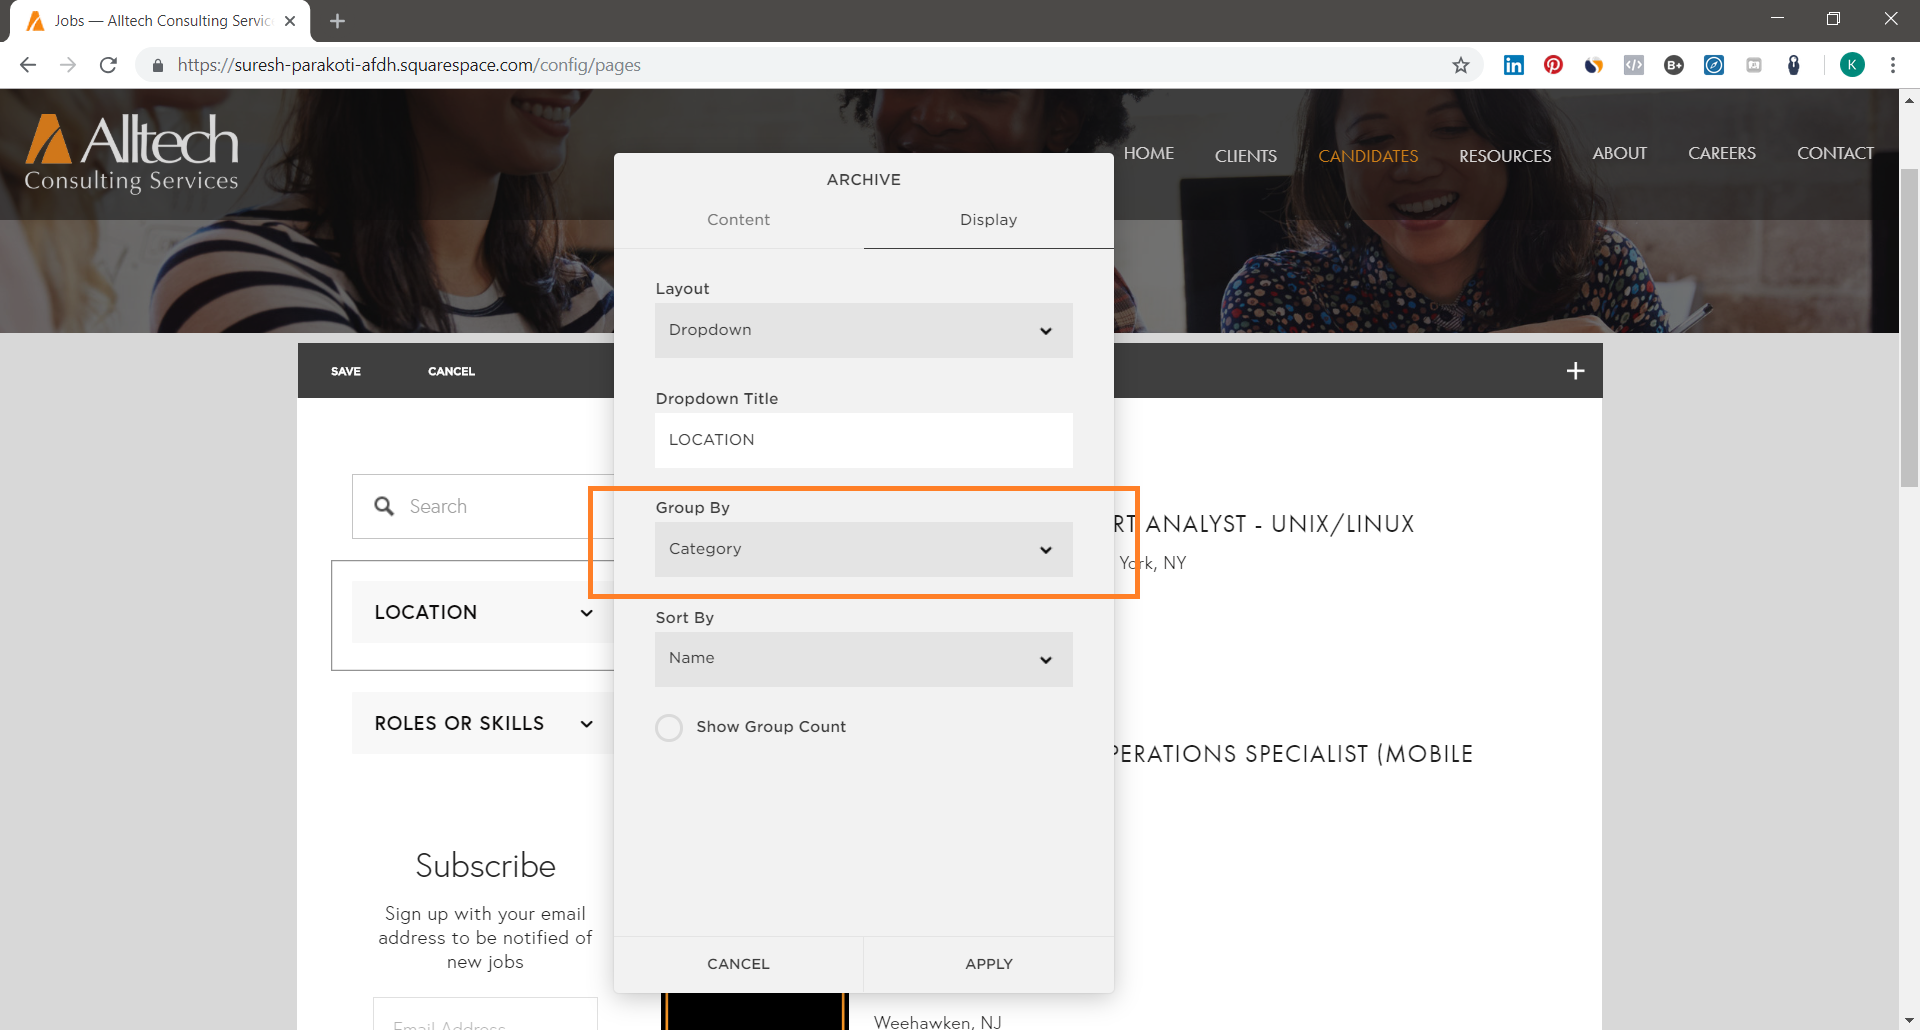
To take it a step further with organization, you can simulate a filter box through the use of the archive blocks. You can assign each archive block to display tags or category markers you’ve attached to each of your job listings. Making it easier to organize and find specific open opportunities based on specific terms. For our listings we choose categories to represent locations. Then in a second archive block, selecting tags, to represent keywords that correspond to each job listing.
Step Five.
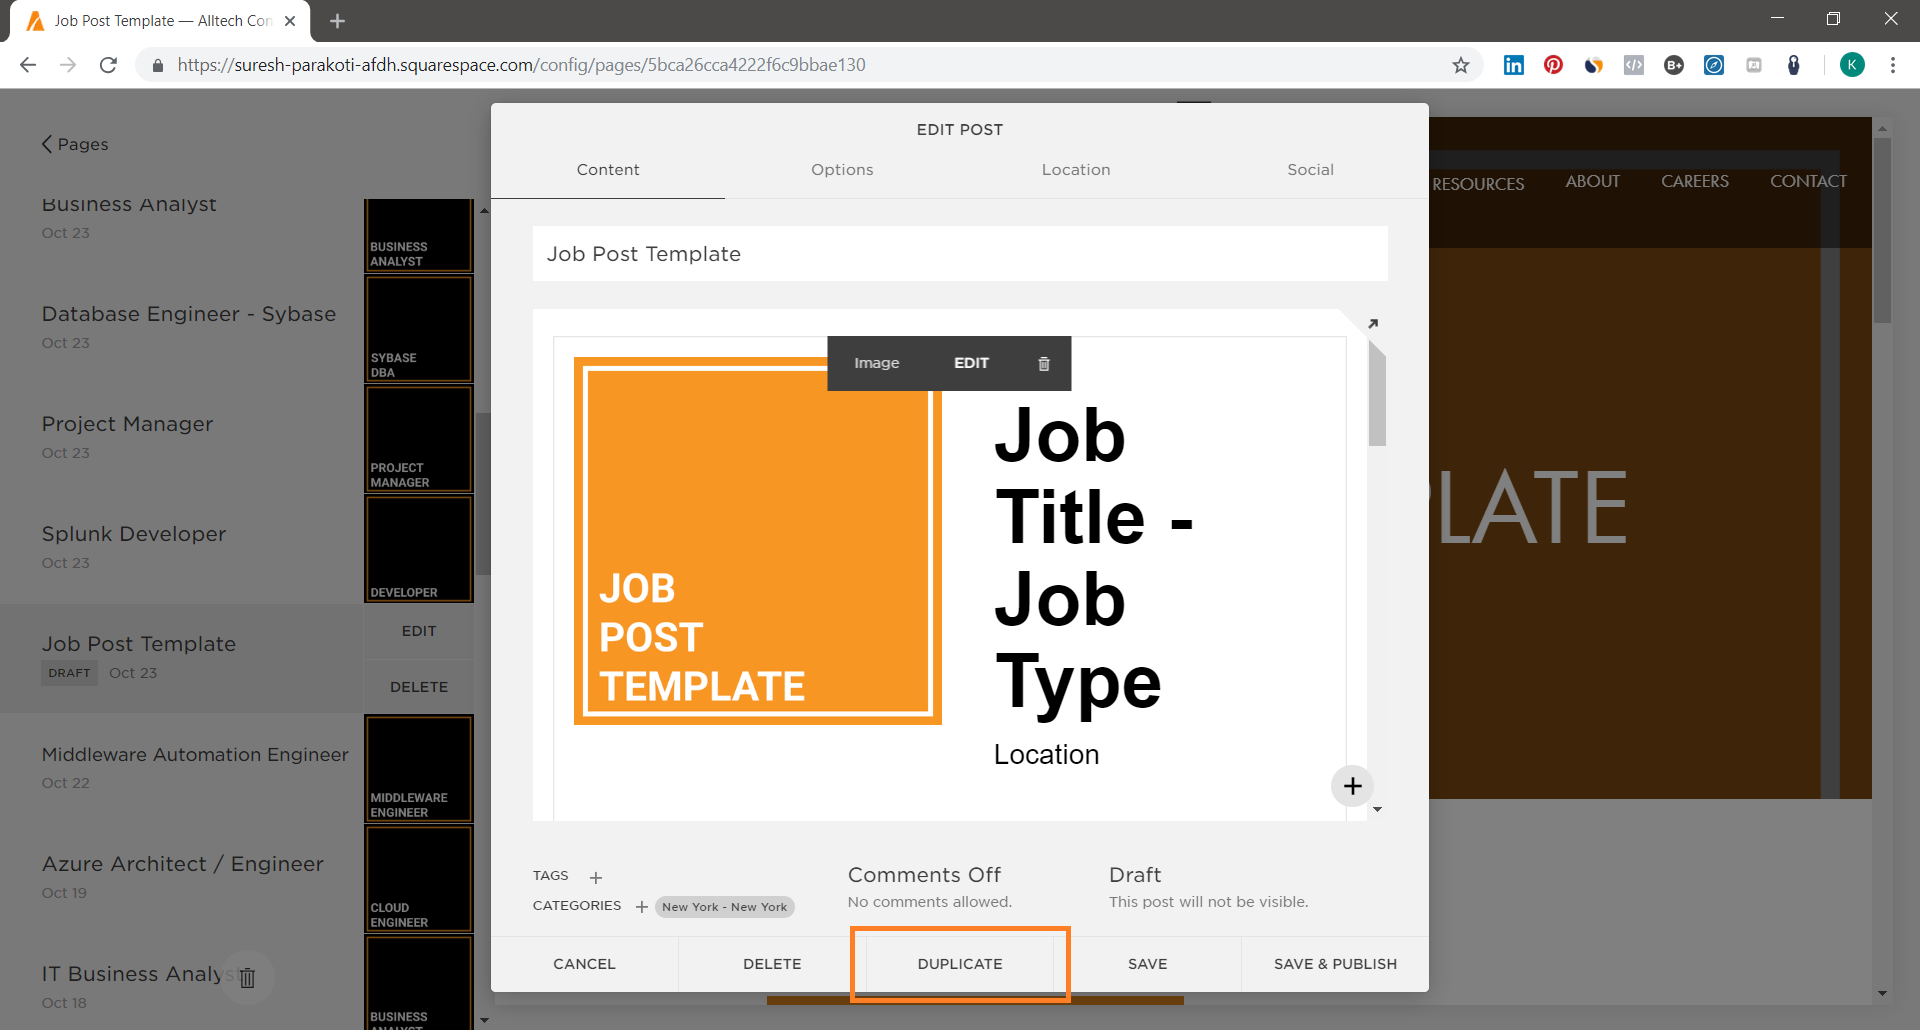
After you have the core page setup, you can then go back to the unlinked blog page and start posting your job opportunities. To make the process run more smoothly, especially when you are posting often, I recommend making a job post template. This way when you go to post a new listing, the core components of the post are already set up for you. You can check out our job listings to get an idea as to how we set up our job posts to look like. Once you have a template and you are ready to post, in order to duplicate, all you have to do is click the edit button on the job post template and then select duplicate. This button is located at the bottom center of the post edit window.
Step Six.
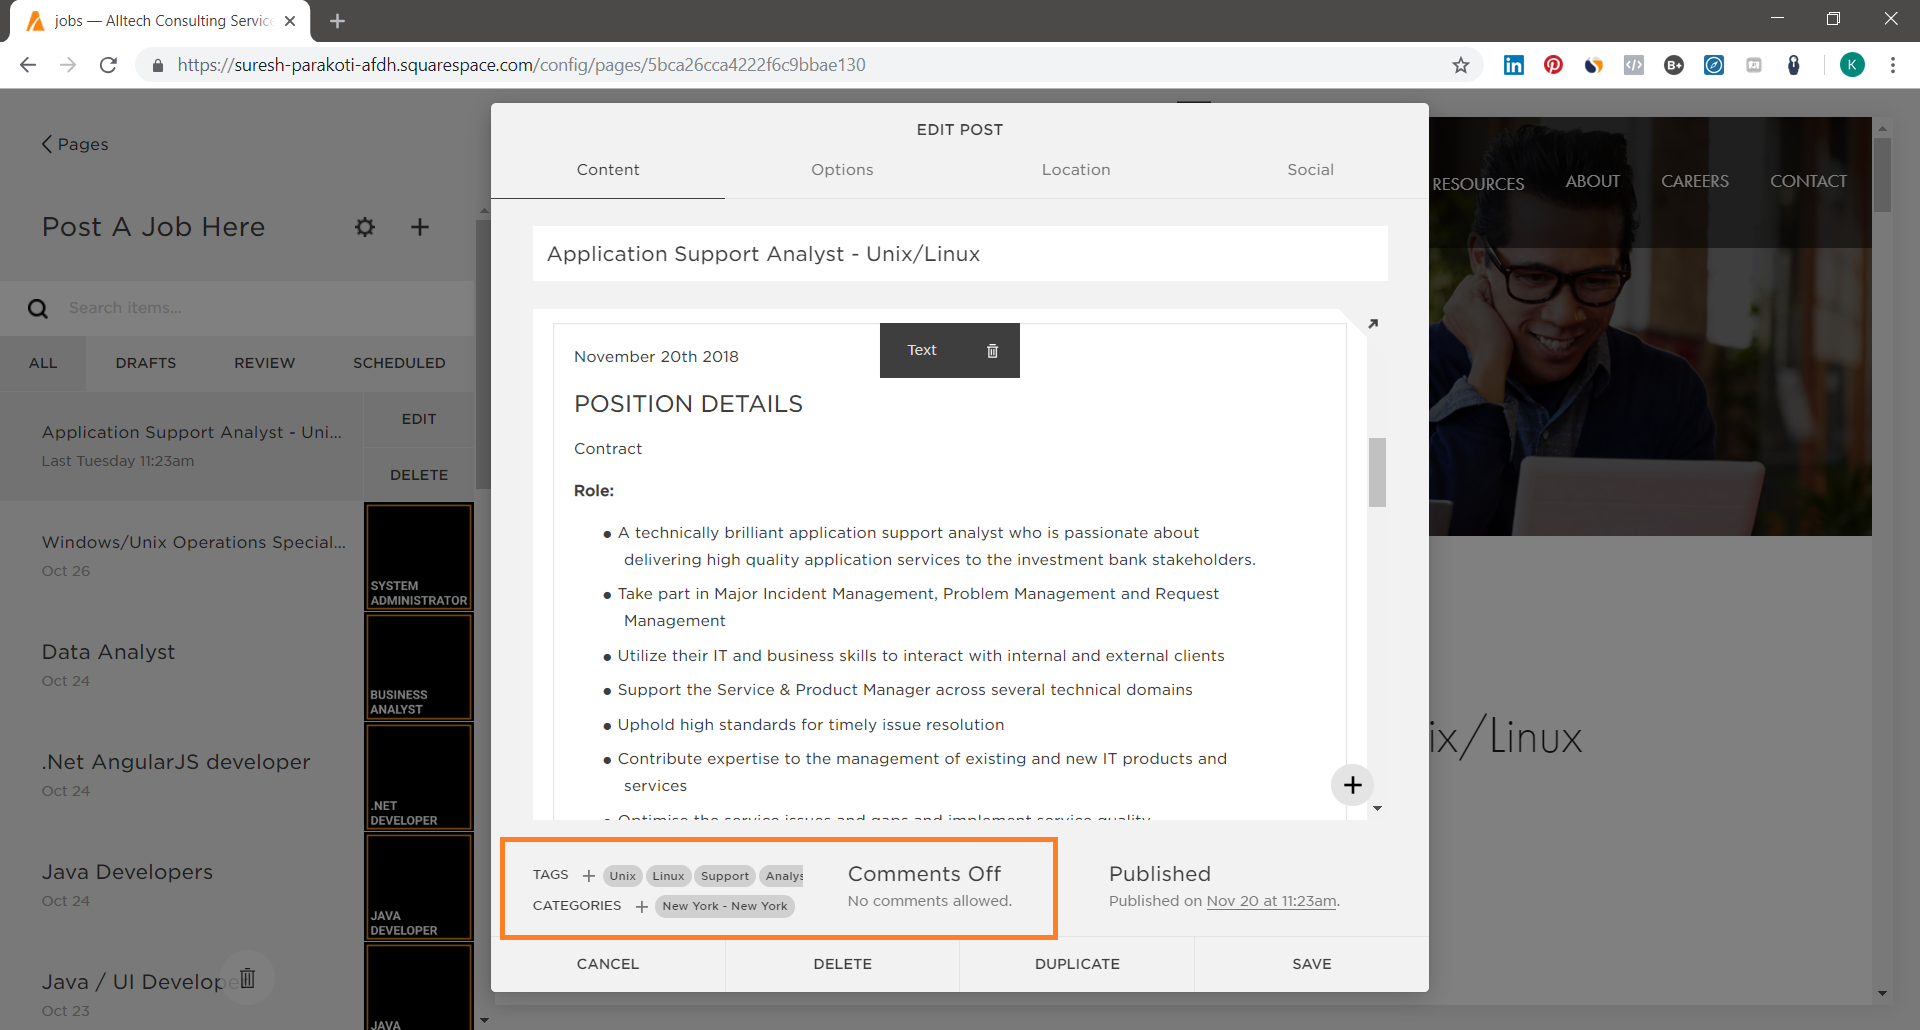
Once you’ve duplicated your post, you can then get started by filling in the job description corresponding to the opportunity you are listing. At the bottom of the edit post window you will see an option to add tags, categories, and to turn commenting on or off. Since these are job listings and commenting is not required, you can turn this feature off. For the tags and categories, label accordingly. Just remember that these labels will be featured in the archive boxes for candidates to filter their searches.
Step Seven.
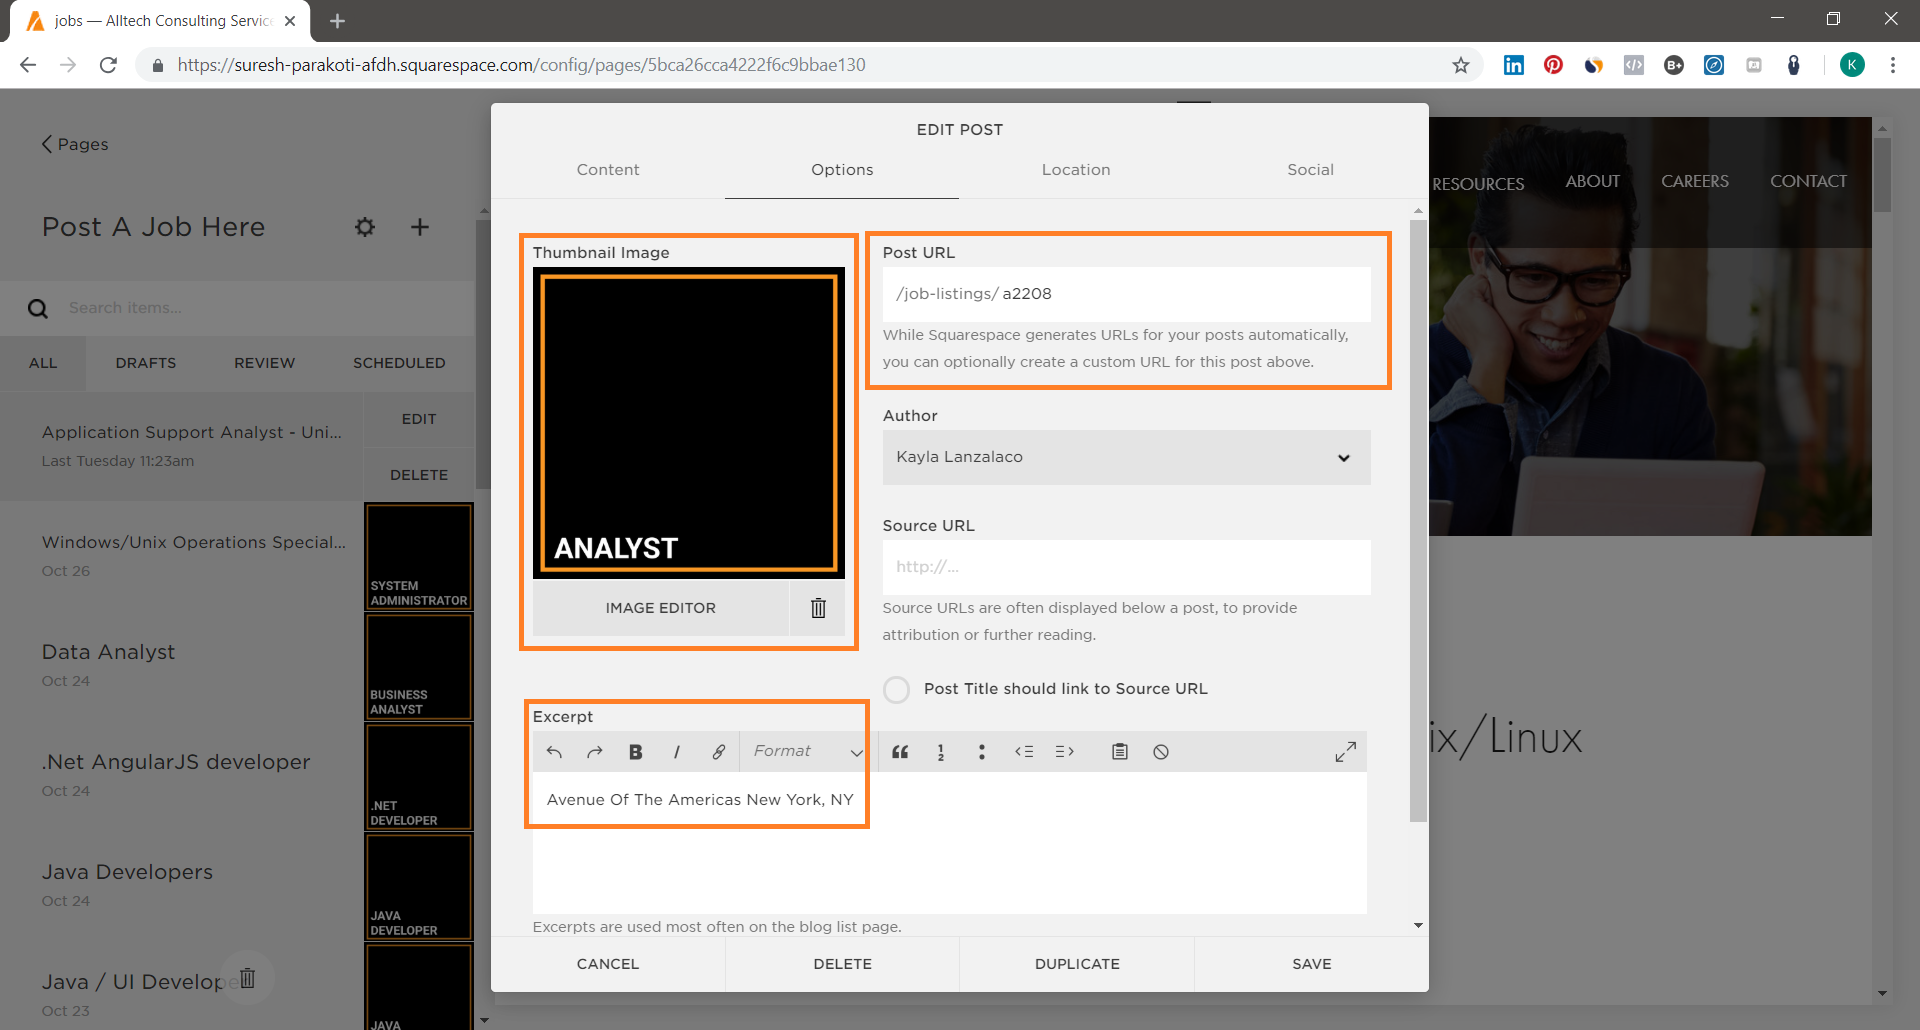
From there you can move on over to where it says options in the edit post box. Here you can add a picture which will be featured in the summary box on your website. You can also add something in the expert box as well. Typically a blog would put a small snippet of what you would be reading if you clicked on it, but since this a job listing i put in the location. This way in the summary block you will see an image, the date of the post, the job title, and its location. Here you can also change the URL link. In order for us to easily find our job postings and to match them with our other database, we changed the URL to match the Job ID code.
Step Eight
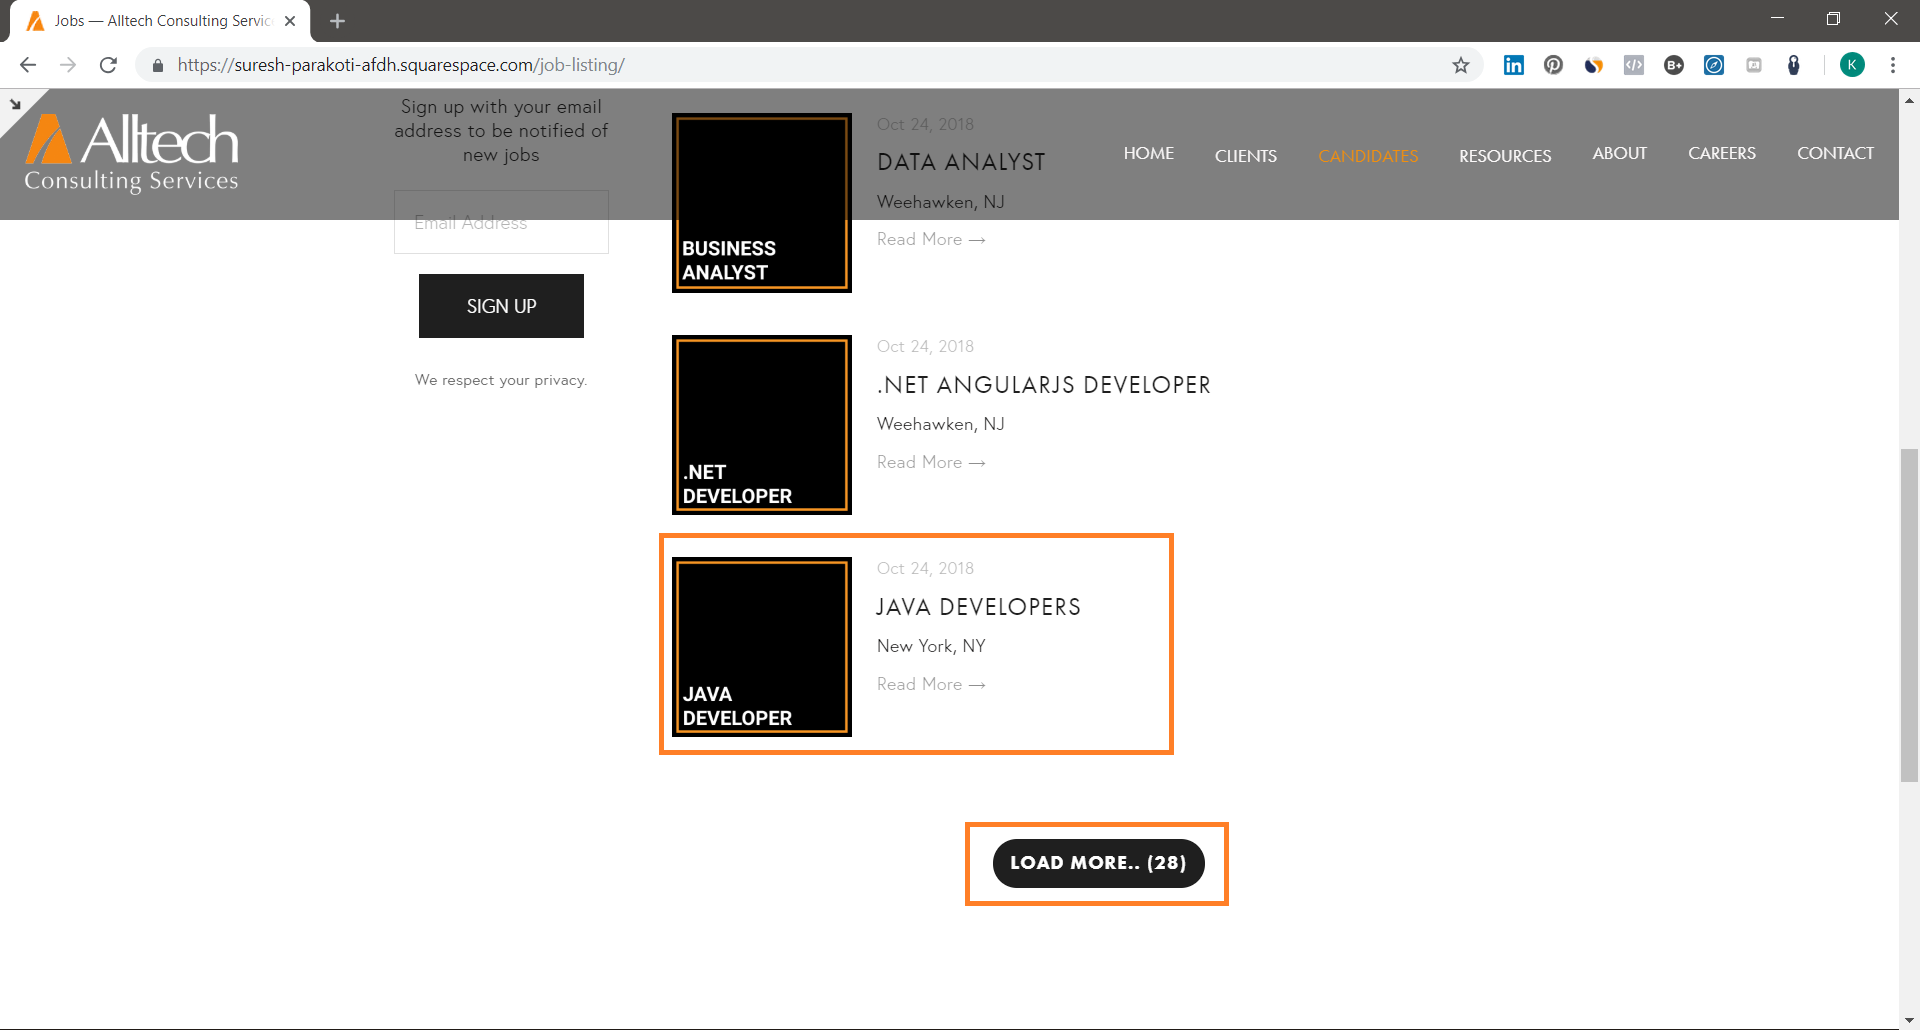
One of the downfalls of the summary box, as is, it will only allow you to display up to 30 posts. So this can pose a problem if you have more than 30 open opportunities at a time. Here you are going to need a little help from a third party source. Unfortunately it is not a free alternative, but it is definitely helpful. For a fee of $50 you can take advantage of this option from a page called SquareWebsites with their code called Lazy Summaries. This will allow you to post more than 30 summaries in your block, giving you this Load More button that you can see we have located at the bottom of our page. To implement this code all you need to do is purchase and then follow the instructions they send you.

Step Nine.
To go a little farther with the custom coding, If you haven’t noticed, you can’t see the author name or date posting that is typically located at the top of the post. I was able to hide these components in order to make the listing more visually pleasing and printer friendly. In our case, the individual who made the posting is not relevant to the candidate. Therefore it wasn’t needed when looking at the listing. In order to achieve this for the Hayden template i added this code to the Post Blog Item Code Injection.

<style>
.entry-date { display: none !important; }
.author { display: none !important; }
</style>
In order to get to the Post Blog Item Code Injection, you need to go to the settings of the blog. From there click Advanced and then scroll down to the bottom of the edit box. Here you can copy and paste the code. Reminder: The code may differ depending on your template. Make sure to make any adjustments to the code in order to fit the template you are working with.

Step Ten.
Now you may be wondering, how does one submit their resume? For this you can utilize your own coded form, or you can take advantage of a third party form service like Cognito Forms. You can easily place this at the bottom of your listings using the Code Block feature.

Step Eleven.
Now sometimes with job listings candidates may want to print or save a pdf copy of it. This can get a bit wonky especially if the webpage isn’t printer friendly. So to combat that and make the page cleaner I installed these printer friendly buttons. They are super simple and easy to use. They can also be customized so only certain things show up on the page when you go to hit print.

To further permit a cleaner printing experience, there is a great feature on the printer friendly buttons that allow you to delete certain pieces of the listing you don’t want. For example here the job title is mentioned twice, so in order to make better use of the space you could highlight and delete the second title from printing.
After all of this you can easily alter or customize your new job board anyway you like. All that matters is that you do what fits your needs.
Have any tips or tricks that work for you?
If you find any additional tweaks beyond what i’ve mentioned here please share!
Any ideas to make the process and user experience even better are more than welcomed!